
iOS多线程编程技术之NSThread、Cocoa NSOperation、GCD
iOS多线程编程技术之NSThread、Cocoa NSOperation、GCD
obj-c GCD 线程 NSThread cocoa NSOperation
iOS多线程编程技术之NSThread、Cocoa NSOperation、GCD
2014-05-20 11:14 编辑: wupeng 分类:iOS开发 来源:CocoaChina
0 7139
iOSGCD多线程编程NSThreadCocoa NSOperation
招聘信息:
精益求精,只为你的再次选择!--上海盟曼iOS,andriod软件外包!
[北京] 外企 [Web Front-end/ Back-end /Ios/Big data/数据挖掘/算法] 工程师
转自容芳志的博客
简介
iOS有三种多线程编程的技术,分别是:
(一)NSThread
(二)Cocoa NSOperation
(三)GCD(全称:Grand Central Dispatch)
这三种编程方式从上到下,抽象度层次是从低到高的,抽象度越高的使用越简单,也是Apple最推荐使用的。
三种方式的优缺点介绍:
1)NSThread:
优点:NSThread 比其他两个轻量级
缺点:需要自己管理线程的生命周期,线程同步。线程同步对数据的加锁会有一定的系统开销
NSThread实现的技术有下面三种:
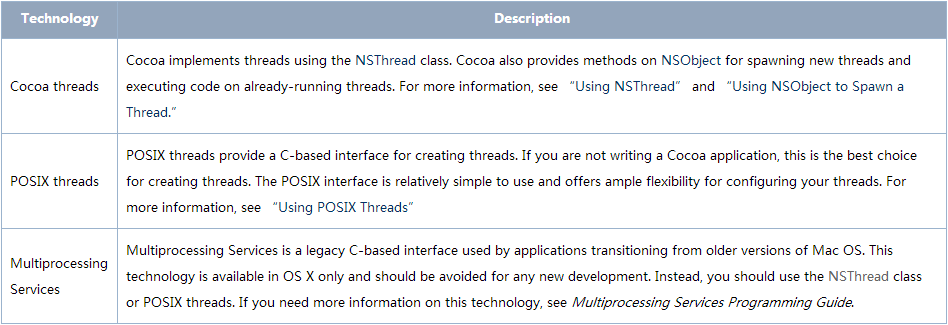
一般使用cocoa thread 技术。
Cocoa NSOperation
优点:不需要关心线程管理,数据同步的事情,可以把精力放在自己需要执行的操作上。
Cocoa operation 相关的类是 NSOperation ,NSOperationQueue。
NSOperation是个抽象类,使用它必须用它的子类,可以实现它或者使用它定义好的两个子类:NSInvocationOperation 和 NSBlockOperation。
创建NSOperation子类的对象,把对象添加到NSOperationQueue队列里执行。
GCD
Grand Central Dispatch (GCD)是Apple开发的一个多核编程的解决方法。在iOS4.0开始之后才能使用。GCD是一个替代诸如NSThread, NSOperationQueue, NSInvocationOperation等技术的很高效和强大的技术。现在的iOS系统都升级到7了,所以不用担心该技术不能使用。
介绍完这三种多线程编程方式,本文将依次介绍这三种技术的使用。
(一)NSThread的使用
NSThread 有两种直接创建方式:
1 - (id)initWithTarget:(id)target selector:(SEL)selector object:(id)argument
2 + (void)detachNewThreadSelector:(SEL)aSelector toTarget:(id)aTarget withObject:(id)anArgument
第一个是实例方法,第二个是类方法
1 1、[NSThread detachNewThreadSelector:@selector(doSomething:) toTarget:self withObject:nil];
2
3 2、NSThread* myThread = [[NSThread alloc] initWithTarget:self
4 selector:@selector(doSomething:)
5 object:nil];
6 [myThread start];
参数的意义:
selector :线程执行的方法,这个selector只能有一个参数,而且不能有返回值。
target :selector消息发送的对象
argument:传输给target的唯一参数,也可以是nil
第一种方式会直接创建线程并且开始运行线程,第二种方式是先创建线程对象,然后再运行线程操作,在运行线程操作前可以设置线程的优先级等线程信息
不显式创建线程的方法:
用NSObject的类方法 performSelectorInBackground:withObject: 创建一个线程:
1 [Obj performSelectorInBackground:@selector(doSomething) withObject:nil];
下载图片的例子:
新建singeView app
新建项目,并在xib文件上放置一个imageView控件。按住control键拖到viewController.h文件中创建imageView IBOutlet ViewController.m中实现:
1 //
2 // ViewController.m
3 // NSThreadDemo
4 //
5 // Created by rongfzh on 12-9-23.
6 // Copyright (c) 2012年 rongfzh. All rights reserved.
7 //
8
9 #import “ViewController.h”
10 #define kURL @”http://avatar.csdn.net/2/C/D/1_totogo2010.jpg“
11 @interface ViewController ()
12
13 @end
14
15 @implementation ViewController
16
17 -(void)downloadImage:(NSString *) url{
18 NSData *data = [[NSData alloc] initWithContentsOfURL:[NSURL URLWithString:url]];
19 UIImage *image = [[UIImage alloc]initWithData:data];
20 if(image == nil){
21
22 }else{
23 [self performSelectorOnMainThread:@selector(updateUI:) withObject:image waitUntilDone:YES];
24 }
25 }
26
27 -(void)updateUI:(UIImage*) image{
28 self.imageView.image = image;
29 }
30
31
32 - (void)viewDidLoad
33 {
34 [super viewDidLoad];
35
36 // [NSThread detachNewThreadSelector:@selector(downloadImage:) toTarget:self withObject:kURL];
37 NSThread *thread = [[NSThread alloc]initWithTarget:self selector:@selector(downloadImage:) object:kURL];
38 [thread start];
39 }
40
41 - (void)didReceiveMemoryWarning
42 {
43 [super didReceiveMemoryWarning];
44 // Dispose of any resources that can be recreated.
45 }
46
47 @end
线程间通讯
线程下载完图片后怎么通知主线程更新界面呢?
1 [self performSelectorOnMainThread:@selector(updateUI:) withObject:image waitUntilDone:YES];
performSelectorOnMainThread是NSObject的方法,除了可以更新主线程的数据外,还可以更新其他线程的比如:
1 performSelector:onThread:withObject:waitUntilDone:
运行下载图片:

线程同步
我们演示一个经典的卖票的例子来讲NSThread的线程同步:
1 #import
2
3 @class ViewController;
4
5 @interface AppDelegate : UIResponder
6 {
7 int tickets;
8 int count;
9 NSThread* ticketsThreadone;
10 NSThread* ticketsThreadtwo;
11 NSCondition* ticketsCondition;
12 NSLock *theLock;
13 }
14 @property (strong, nonatomic) UIWindow *window;
15
16 @property (strong, nonatomic) ViewController *viewController;
17
18 @end
1 - (BOOL)application:(UIApplication *)application didFinishLaunchingWithOptions:(NSDictionary *)launchOptions
2 {
3
4 tickets = 100;
5 count = 0;
6 theLock = [[NSLock alloc] init];
7 // 锁对象
8 ticketsCondition = [[NSCondition alloc] init];
9 ticketsThreadone = [[NSThread alloc] initWithTarget:self selector:@selector(run) object:nil];
10 [ticketsThreadone setName:@”Thread-1”];
11 [ticketsThreadone start];
12
13
14 ticketsThreadtwo = [[NSThread alloc] initWithTarget:self selector:@selector(run) object:nil];
15 [ticketsThreadtwo setName:@”Thread-2”];
16 [ticketsThreadtwo start];
17
18 self.window = [[UIWindow alloc] initWithFrame:[[UIScreen mainScreen] bounds]];
19 // Override point for customization after application launch.
20 self.viewController = [[ViewController alloc] initWithNibName:@”ViewController” bundle:nil];
21 self.window.rootViewController = self.viewController;
22 [self.window makeKeyAndVisible];
23 return YES;
24 }
25
26 - (void)run{
27 while (TRUE) {
28 // 上锁
29 // [ticketsCondition lock];
30 [theLock lock];
31 if(tickets >= 0){
32 [NSThread sleepForTimeInterval:0.09];
33 count = 100 - tickets;
34 NSLog(@”当前票数是:%d,售出:%d,线程名:%@”,tickets,count,[[NSThread currentThread] name]);
35 tickets–;
36 }else{
37 break;
38 }
39 [theLock unlock];
40 // [ticketsCondition unlock];
41 }
42 }
如果没有线程同步的lock,卖票数可能是-1.加上lock之后线程同步保证了数据的正确性。
上面例子我使用了两种锁,一种NSCondition ,一种是:NSLock。 NSCondition我已经注释了。
线程的顺序执行
他们都可以通过[ticketsCondition signal]; 发送信号的方式,在一个线程唤醒另外一个线程的等待。
比如:
1 #import “AppDelegate.h”
2
3 #import “ViewController.h”
4
5 @implementation AppDelegate
6
7 - (BOOL)application:(UIApplication *)application didFinishLaunchingWithOptions:(NSDictionary *)launchOptions
8 {
9
10 tickets = 100;
11 count = 0;
12 theLock = [[NSLock alloc] init];
13 // 锁对象
14 ticketsCondition = [[NSCondition alloc] init];
15 ticketsThreadone = [[NSThread alloc] initWithTarget:self selector:@selector(run) object:nil];
16 [ticketsThreadone setName:@”Thread-1”];
17 [ticketsThreadone start];
18
19 ticketsThreadtwo = [[NSThread alloc] initWithTarget:self selector:@selector(run) object:nil];
20 [ticketsThreadtwo setName:@”Thread-2”];
21 [ticketsThreadtwo start];
22
23 NSThread *ticketsThreadthree = [[NSThread alloc] initWithTarget:self selector:@selector(run3) object:nil];
24 [ticketsThreadthree setName:@”Thread-3”];
25 [ticketsThreadthree start];
26 self.window = [[UIWindow alloc] initWithFrame:[[UIScreen mainScreen] bounds]];
27 // Override point for customization after application launch.
28 self.viewController = [[ViewController alloc] initWithNibName:@”ViewController” bundle:nil];
29 self.window.rootViewController = self.viewController;
30 [self.window makeKeyAndVisible];
31 return YES;
32 }
33
34 -(void)run3{
35 while (YES) {
36 [ticketsCondition lock];
37 [NSThread sleepForTimeInterval:3];
38 [ticketsCondition signal];
39 [ticketsCondition unlock];
40 }
41 }
42
43 - (void)run{
44 while (TRUE) {
45 // 上锁
46 [ticketsCondition lock];
47 [ticketsCondition wait];
48 [theLock lock];
49 if(tickets >= 0){
50 [NSThread sleepForTimeInterval:0.09];
51 count = 100 - tickets;
52 NSLog(@”当前票数是:%d,售出:%d,线程名:%@”,tickets,count,[[NSThread currentThread] name]);
53 tickets–;
54 }else{
55 break;
56 }
57 [theLock unlock];
58 [ticketsCondition unlock];
59 }
60 }
wait是等待,我加了一个 线程3 去唤醒其他两个线程锁中的wait
其他同步
我们可以使用指令 @synchronized 来简化 NSLock的使用,这样我们就不必显示编写创建NSLock,加锁并解锁相关代码。
1 - (void)doSomeThing:(id)anObj
2 {
3 @synchronized(anObj)
4 {
5 // Everything between the braces is protected by the @synchronized directive.
6 }
7 }
还有其他的一些锁对象,比如:循环锁NSRecursiveLock,条件锁NSConditionLock,分布式锁NSDistributedLock等等,可以自己看官方文档学习
NSThread下载图片的例子代码:http://download.csdn.net/detail/totogo2010/4591149
(二)Cocoa NSOperation的使用
使用 NSOperation的方式有两种,
一种是用定义好的两个子类:NSInvocationOperation 和 NSBlockOperation。
另一种是继承NSOperation
如果你也熟悉Java,NSOperation就和java.lang.Runnable接口很相似。和Java的Runnable一样,NSOperation也是设计用来扩展的,只需继承重写NSOperation的一个方法main。相当与java 中Runnalbe的Run方法。然后把NSOperation子类的对象放入NSOperationQueue队列中,该队列就会启动并开始处理它。
NSInvocationOperation例子:
这里同样,我们实现一个下载图片的例子。新建一个Single View app,拖放一个ImageView控件到xib界面。
实现代码如下:
1 #import “ViewController.h”
2 #define kURL @”http://avatar.csdn.net/2/C/D/1_totogo2010.jpg“
3
4 @interface ViewController ()
5
6 @end
7
8 @implementation ViewController
9
10 - (void)viewDidLoad
11 {
12 [super viewDidLoad];
13 NSInvocationOperation *operation = [[NSInvocationOperation alloc]initWithTarget:self
14 selector:@selector(downloadImage:)
15 object:kURL];
16
17 NSOperationQueue *queue = [[NSOperationQueue alloc]init];
18 [queue addOperation:operation];
19 // Do any additional setup after loading the view, typically from a nib.
20 }
21
22 -(void)downloadImage:(NSString *)url{
23 NSLog(@”url:%@”, url);
24 NSURL *nsUrl = [NSURL URLWithString:url];
25 NSData *data = [[NSData alloc]initWithContentsOfURL:nsUrl];
26 UIImage * image = [[UIImage alloc]initWithData:data];
27 [self performSelectorOnMainThread:@selector(updateUI:) withObject:image waitUntilDone:YES];
28 }
29 -(void)updateUI:(UIImage*) image{
30 self.imageView.image = image;
31 }
代码注释:
1.viewDidLoad方法里可以看到我们用NSInvocationOperation建了一个后台线程,并且放到2.NSOperationQueue中。后台线程执行downloadImage方法。
3.downloadImage 方法处理下载图片的逻辑。下载完成后用performSelectorOnMainThread执行主线程updateUI方法。
updateUI 并把下载的图片显示到图片控件中。
运行可以看到下载图片显示在界面上。
%!(EXTRA markdown.ResourceType=, string=, string=)
第二种方式继承NSOperation��
在.m文件中实现main方法,main方法编写要执行的代码即可。
如何控制线程池中的线程数?
队列里可以加入很多个NSOperation, 可以把NSOperationQueue看作一个线程池,可往线程池中添加操作(NSOperation)到队列中。线程池中的线程可看作消费者,从队列中取走操作,并执行它。
通过下面的代码设置:
1 [queue setMaxConcurrentOperationCount:5];
线程池中的线程数,也就是并发操作数。默认情况下是-1,-1表示没有限制,这样会同时运行队列中的全部的操作。
(三)GCD的介绍和使用
介绍:
Grand Central Dispatch 简称(GCD)是苹果公司开发的技术,以优化的应用程序支持多核心处理器和其他的对称多处理系统的系统。这建立在任务并行执行的线程池模式的基础上的。它首次发布在Mac OS X 10.6 ,iOS 4及以上也可用。
设计:
GCD的工作原理是:让程序平行排队的特定任务,根据可用的处理资源,安排他们在任何可用的处理器核心上执行任务。
一个任务可以是一个函数(function)或者是一个block。 GCD的底层依然是用线程实现,不过这样可以让程序员不用关注实现的细节。
GCD中的FIFO队列称为dispatch queue,它可以保证先进来的任务先得到执行。
dispatch queue分为下面三种:
Serial
又称为private dispatch queues,同时只执行一个任务。Serial queue通常用于同步访问特定的资源或数据。当你创建多个Serial queue时,虽然它们各自是同步执行的,但Serial queue与Serial queue之间是并发执行的。
Concurrent
又称为global dispatch queue,可以并发地执行多个任务,但是执行完成的顺序是随机的。
Main dispatch queue
它是全局可用的serial queue,它是在应用程序主线程上执行任务的。
我们看看dispatch queue如何使用?
1、常用的方法dispatch_async
为了避免界面在处理耗时的操作时卡死,比如读取网络数据,IO,数据库读写等,我们会在另外一个线程中处理这些操作,然后通知主线程更新界面。
用GCD实现这个流程的操作比前面介绍的NSThread NSOperation的方法都要简单。代码框架结构如下:
1 dispatch_async(dispatch_get_global_queue(DISPATCH_QUEUE_PRIORITY_DEFAULT, 0), ^{
2 // 耗时的操作
3 dispatch_async(dispatch_get_main_queue(), ^{
4 // 更新界面
5 });
6 });
如果这样还不清晰的话,那我们还是用上两篇博客中的下载图片为例子,代码如下:
1 dispatch_async(dispatch_get_global_queue(DISPATCH_QUEUE_PRIORITY_DEFAULT, 0), ^{
2 NSURL * url = [NSURL URLWithString:@”http://avatar.csdn.net/2/C/D/1_totogo2010.jpg“];
3 NSData * data = [[NSData alloc]initWithContentsOfURL:url];
4 UIImage *image = [[UIImage alloc]initWithData:data];
5 if (data != nil) {
6 dispatch_async(dispatch_get_main_queue(), ^{
7 self.imageView.image = image;
8 });
9 }
10 });
运行显示:
%!(EXTRA markdown.ResourceType=, string=, string=)
是不是代码比NSThread NSOperation简洁很多,而且GCD会自动根据任务在多核处理器上分配资源,优化程序。
系统给每一个应用程序提供了三个concurrent dispatch queues。这三个并发调度队列是全局的,它们只有优先级的不同。因为是全局的,我们不需要去创建。我们只需要通过使用函数dispath_get_global_queue去得到队列,如下:
1 dispatch_queue_t globalQ = dispatch_get_global_queue(DISPATCH_QUEUE_PRIORITY_DEFAULT, 0);
这里也用到了系统默认就有一个串行队列main_queue:
1 dispatch_queue_t mainQ = dispatch_get_main_queue();
虽然dispatch queue是引用计数的对象,但是以上两个都是全局的队列,不用retain或release。
2、dispatch_group_async的使用
dispatch_group_async可以实现监听一组任务是否完成,完成后得到通知执行其他的操作。这个方法很有用,比如你执行三个下载任务,当三个任务都下载完成后你才通知界面说完成的了。下面是一段例子代码:
1 dispatch_queue_t queue = dispatch_get_global_queue(DISPATCH_QUEUE_PRIORITY_DEFAULT, 0);
2 dispatch_group_t group = dispatch_group_create();
3 dispatch_group_async(group, queue, ^{
4 [NSThread sleepForTimeInterval:1];
5 NSLog(@”group1”);
6 });
7 dispatch_group_async(group, queue, ^{
8 [NSThread sleepForTimeInterval:2];
9 NSLog(@”group2”);
10 });
11 dispatch_group_async(group, queue, ^{
12 [NSThread sleepForTimeInterval:3];
13 NSLog(@”group3”);
14 });
15 dispatch_group_notify(group, dispatch_get_main_queue(), ^{
16 NSLog(@”updateUi”);
17 });
18 dispatch_release(group);
dispatch_group_async是异步的方法,运行后可以看到打印结果:
1 2012-09-25 16:04:16.737 gcdTest[43328:11303] group1
2 2012-09-25 16:04:17.738 gcdTest[43328:12a1b] group2
3 2012-09-25 16:04:18.738 gcdTest[43328:13003] group3
4 2012-09-25 16:04:18.739 gcdTest[43328:f803] updateUi
每个一秒打印一个,当第三个任务执行后,upadteUi被打印。
3、dispatch_barrier_async的使用
dispatch_barrier_async是在前面的任务执行结束后它才执行,而且它后面的任务等它执行完成之后才会执行
例子代码如下:
1 dispatch_queue_t queue = dispatch_queue_create(“gcdtest.rongfzh.yc”, DISPATCH_QUEUE_CONCURRENT);
2 dispatch_async(queue, ^{
3 [NSThread sleepForTimeInterval:2];
4 NSLog(@”dispatch_async1”);
5 });
6 dispatch_async(queue, ^{
7 [NSThread sleepForTimeInterval:4];
8 NSLog(@”dispatch_async2”);
9 });
10 dispatch_barrier_async(queue, ^{
11 NSLog(@”dispatch_barrier_async”);
12 [NSThread sleepForTimeInterval:4];
13
14 });
15 dispatch_async(queue, ^{
16 [NSThread sleepForTimeInterval:1];
17 NSLog(@”dispatch_async3”);
18 });
打印结果:
1 2012-09-25 16:20:33.967 gcdTest[45547:11203] dispatch_async1
2 2012-09-25 16:20:35.967 gcdTest[45547:11303] dispatch_async2
3 2012-09-25 16:20:35.967 gcdTest[45547:11303] dispatch_barrier_async
4 2012-09-25 16:20:40.970 gcdTest[45547:11303] dispatch_async3
请注意执行的时间,可以看到执行的顺序如上所述。
4、dispatch_apply��
执行某个代码片段N次。
1 dispatch_apply(5, globalQ, ^(size_t index) {
2 // 执行5次
3 });
本篇使用的到的例子代码:http://download.csdn.net/detail/totogo2010/4596471
GCD还有很多其他用法,可以参考官方文档、http://en.wikipedia.org/wiki/Grand_Central_Dispatch
扩展阅读:
